Pages

Showing posts with label Tutorial. Show all posts

Wednesday, May 7, 2014

Box Card/Gift Card Holder - Tutorial


Yesterday I posted my new favourite Gift Card Holder!   I am loving the versatility and fun of the box card and now you can add a gift card and make it the perfect gift for anyone you know!   Check Pinterest, I promise you will find a box card theme to meet your needs.

Here it is, the quick how to so you can get creating some fun cards.

 Start with a piece of Card Stock measuring 4 1/4" x 11.
Score the 4 1/4"  end at 2 1/4".
Score the 11" end at 3 1/2", 5", 8 1/2" and 10".   Cut the score lines on one side down to the center line (I cut it on the 2" side so the flaps were a little shorter than the base of the card). Trim off the short tab (as seen in the picture)
Cut 2 small scrap pieces to 4 1/2" x  1" and score at 1/2" on both ends.  Fold into a Z shape and add adhesive.  

These are the pieces you will put inside the box to attach your embellishments.

 It is easier to attach your DSP pieces to the flaps after your box is assembled. This way you know what side of the flap to use and which way is up.   DSP Sizes needed are 2 each:
1 7/8"x  3 3/8"  and  1 7/8" x 1 3/8" You are now ready to add your Z shaped inserts.
 Here is a quick shot of what the interior looks like.  I attach the embellishments with window sheets usually in order to give the illusion of floating.  


Now on to the Gift Card holder.   Cut a piece of Card Stock (in the same colour as the base) to 4 1/2" (plus 1/16") x 1 3/8".   Score on both ends at 1/2".  Add adhesive as shown.
Cover the front with DSP, measuring
3 3/8" x 1 1/4"


Attach to the backside of the box card.

If you want to add a layer for writing on it would measure
3 3/4" x 3 3/8".


Here is another finished card.  I love the new word bubbles stamp set and framelits.     Too Fun.  As I said, I used window sheets to make the bubbles appear to float.  

Let me know what you think and if you create a card I would love to see it.


Tuesday, March 18, 2014

Box Cards ... They are all the rage!

Have you seen the Box Card!?  If not I would be shocked.  These great, fun and cute cards are all over Pinterest and Crafting blogs right now.   The ideas for these are endless and they fold up and fit in a envelope!  Love it!


  I saw a similar card to this on Pinterest and when one of my friends and clients had her baby last month I could not resist Casing it!   Zoo Babies is one of my favourite stamp sets and a perfect fit for this card!
I used the I am Me DSP for it's fun, bright colours.
To finish off the card you add a panel on the back for your sentiments and such.   Below is a link to a tutorial and video I found from Angie at Chic n' Scratch!   These are so fun, I even made another for an upcoming club!


cardinabox_b  Check it out and then have fun creating!

Here is a peek at the Mothers Day Card I made for an upcoming club.  


Saturday, March 8, 2014

Easter Treat box - Tutorial

It is finally looking like spring in Calgary, warm weather and melting snow!  I was outside in a T-shirt today and it was AMAZING!!   So with spring comes Easter.  Last year I had some cute little Easter treats that I gave the girls.  They were a combination of treat box and easel card.  Recently I have had a couple of inquires about how I made this fun little treat!   So here we are.  A quick little "How To."


 Above is a picture of the treats I made last year.   I used the Matchbox Die (now retired) and added a cute little easel card on top.

If you did not get the Matchbox Die, don't worry, I have some dimensions below to create your own.

 First lets re-create the punch art bunny.  I found this bunny on Dawn Olchefske's blog, DOstamping with Dawn.  I had to cut him down to fit the card.  I missed the heart in this picture but I got it from the Owl Builder Punch and the whiskers are cut from a scrap piece of card stock.
Once your bunny is put together you can fold down the ear to make him even cuter!   I drew a little line below his nose.


 Dimensions for the the easel card:

5 x 2
scored at 2 1/2  and 3 1/2


If you have a Matchbox Die, use it!  It is so easy and quick.   If not here are the dimensions:

Base: 4 3/4 x 5 1/4
Score on all sides at 5/8 and 1 3/8  then cut away the sections shown and create your tabs.

Top (wraps around base):
2 1/2 x 6 1/2
Scored at 3/4, 2 7/8, 3 5/8,
5 3/4

Adhere the box together to create a base section and wrap-around.  See Below.  


I filled the box with chocolate Easter eggs.   Any punch art would work on the cover or even a great little stamp.     If you do not have the punches for this bunny than check Pinterest for other options as there are many different punch art bunnies.

I hope this helps, if you have any questions or comments please let me know. Have a great day.


Wednesday, August 21, 2013

Splitcoast Stampers Tutorial! - Owl Sucker Holder

Last Halloween I created a cute little broom out of a sucker for my Halloween Club project.  I was really happy with how it turned out but I never thought in my wildest dreams it would be featured on Splitcoast Stampers!   SCS is one of my absolutely favourite web sites for paper crafting.  There are literally thousands of ideas, examples, and tutorials. 

Bette from SCS contacted me and told me she had chosen my little broom to feature as a Tutorial this August and I was honoured.    I set to work on a tutorial and Bette was nice enough to make a video.  So today it went live! 

If you have not been to the Splitcoast Stampers webpage then you should check it out.  The gallery alone is worth the visit.  There is an entire Stampin' Up Gallery that is categorized by stamp set so if you have a set that you want to use you can look it up on this site and get tons of great ideas for it.

Check it out at www.splitcoaststampers.com you will not regret it.

 
Here is the link to the Tutorial on SCS.
 
 
Have a great Day!
 
And don't forget to check out the LNS Treasure Hunt for your chance to win FREE Stampin' Up Products!   Click Here.
 
 
Janet Y


Tuesday, July 2, 2013

Book Lovers Gift Box - Tutorial

A few days ago I posted about some of the gifts I made for my girls teachers.  One in particular got a lot of attention so I thought I would do up a quick tutorial for all of the people who have been asking. 

Here it is, the "Book Lovers Gift Box."  This box holds a gift card perfectly.


Supplies

Designer Series Paper
Card Stock
Chip Board
Strong Adhesive
Sanding Block
Paper Trimmer
Embellishments to Decorate
 
 
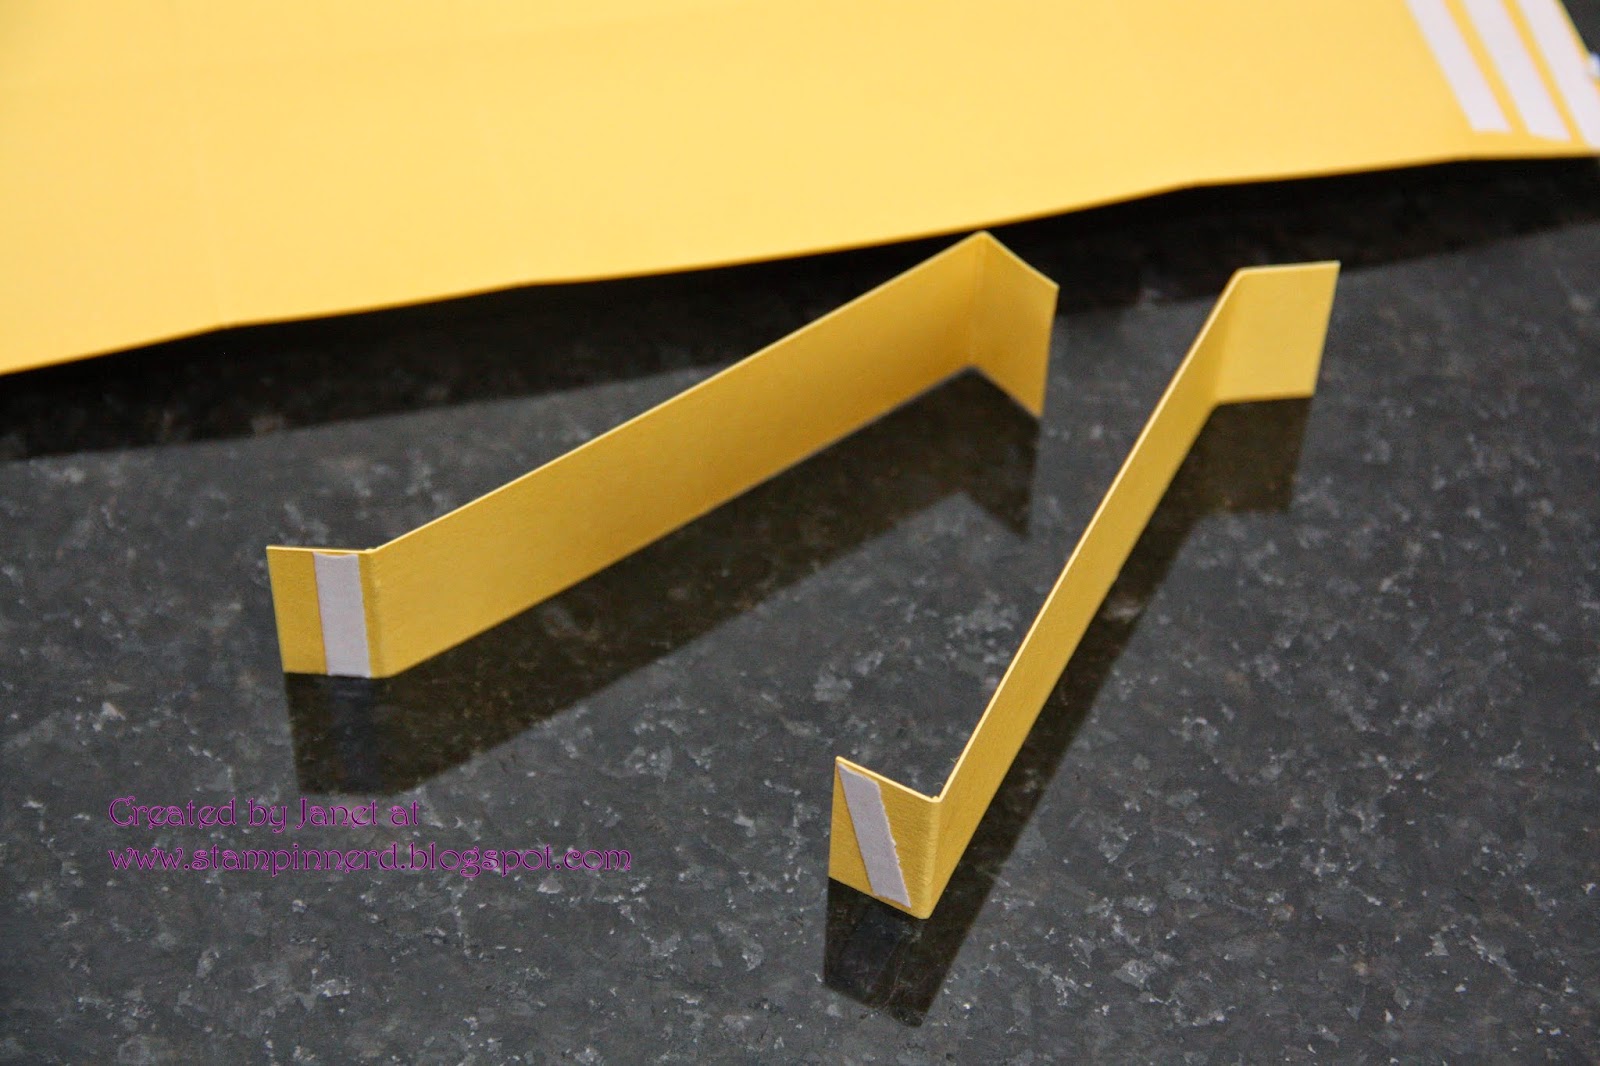
Cut your Cardstock down to the following measurements. 
1 piece - 4 x 5 1/4
1 piece - 3 7/8 x 5 1/8
Score both pieces on all sides at 3/4" and cut slits as shown in photo above.

You will also cut a third piece for the spine  4 x 1 1/2  (save for later).

Cut out 2 pieces of Chipboard sized  4 x 2 3/4


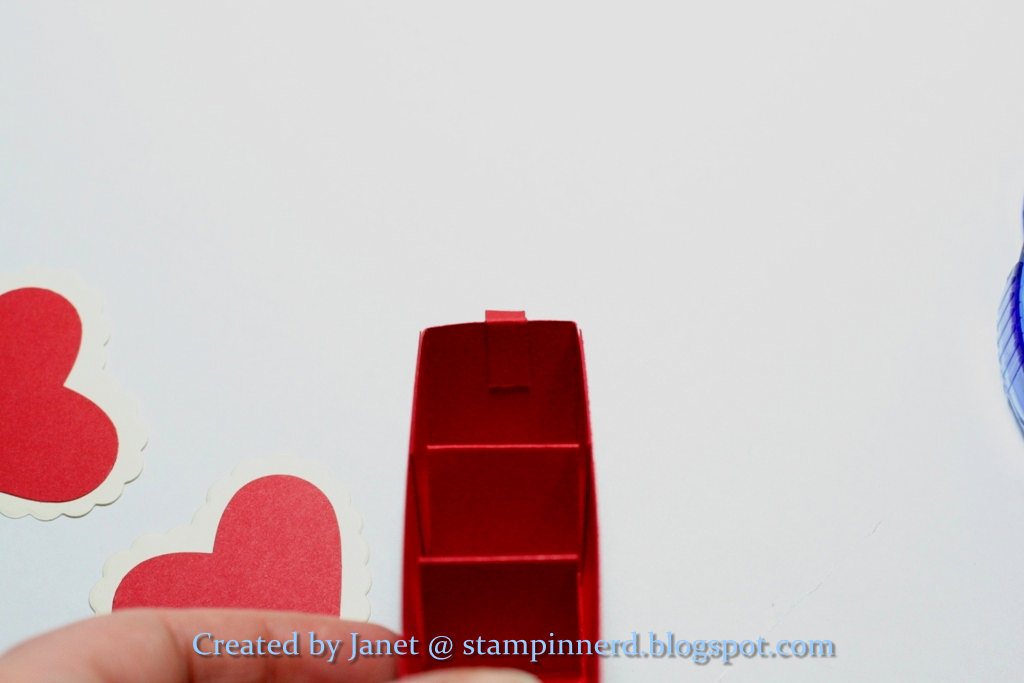
 Using sticky strip or strong adhesive create your two halves of the box.  One will be slightly smaller than the other and will fit perfectly inside.  Set aside.


 Now you can cut your DSP sized 4 x 2 3/4.  I cut 4 pieces so I could cover both the inside and outside of the covers.  For my original I actually only used DSP on the outside covers and used the ink on the insides of the covers. 
Using strong adhesive (I used sticky strip and glue) attach the DSP to the Chipboard.  Once they are attached you can use your sanding block to make the edges smooth.
 Now it is time to glue your Cardstock box to your Chipboard Covers. Top picture.

To do this you MUST Put the two side of your Box Together! This is important.


Put the box together using strong adhesive and then, add the front cover on, make sure that the box lines up with the spine side of your book cover.  (Pictured on the Right).  Then add on the back cover and be sure the line up the cover to the same spine side as the front cover. 
Now to add the spine.  Score your card stock piece that is
4 x 1/2 at 1/4" on each of the long sides.

To get that Book Spine Look be sure to add some outward scored lines.  See the spine on the Right, I hope they showed up ok.

Then use sticky strip or some other strong adhesive to glue this to the book covers as shown to the right.


When your book is open it will look like this ...


Now it is time to decorate.  To add a bookmark, just glue some ribbon to the inside of the spine.


A little button, knot or other embellishments add a great little flair and the options for the front are endless.  Stampin' Up has a few new stamp sets and punches that would be great for this project!
 
I just love the This and That DSP for these books.  It is so fun and really versatile.  Another great add-on is the six-sided sampler and punch.
 
Well I hope you find this tutorial helpful and I hope you will comment below and let me know what you think.  If you make some of these I would love to see them.  Email me the link to your blog or a photo of your work.
 
Thanks everyone who had really kind words about my project.
 
Have a great day
 
Janet Y

Friday, January 25, 2013

Valentines Sliding Treat Holder - Tutorial

I have been thinking about how to give my kids some cute Valentines gifts this year and one of my ideas was a Pez dispenser.  I came up with this sliding treat holder.   Hope you like it! :)


Supplies

Real Red Card Stock
Adhesive|
Heart Punch or Framelit
Stamps, Ribbon, DSP
Paper Cutter


You will need the following sizes of Real Red for the base.

5 1/4" x 4 3/8"

6 3/4" x 3 1/2"

1" x 10"


Score the 5 1/4" x 4 3/8" piece at
1/2, 1 3/4, 2 7/8, 4 1/8 on the long side.

Score the 6 3/4" x 3 1/2" piece at
1 1/4 on all sides.

Score the 1" x 10" at every inch.

Once you have the pieces scored you can assemble them as you see to the right.

Hint -- Decorate the outer 5 1/4 x 4 3/8 sleeve before you glue that piece together.


This is the inside piece.  Using the long 10" x 1" piece I created slots for my candies.  I adhered this in to the open box 6 3/4 x 3 1/2 piece.


For the top piece or the "pull" I used a small scrap piece of Real Red measuring 1/4" x 3".  I then folded it into a W (scoring at about 1, 1 1/2 and 2.


I glued this small piece on to the top of my insert and made sure to fold part of it into the top as you see to the right so it would not just pop off when you pulled on it.
From a different angle you can see the small lip I created to attach the heart to.
I have no idea why I took this picture upside down but I forgot to flip it in editing so there you go!  The Hearts attach to the small lip, one on either side.


Below is the finished product.  You just fill with treats (I used Kisses) and give to your Valentine!
 
 
Don't forget Sale-a-Bration is on right now!  Click below to see how you can get FREE stuff!!


Have a great Day!!!
Janet Y
janetyates@shaw.ca 

Related Posts Plugin for WordPress, Blogger...