Pages

Showing posts with label Gifts. Show all posts

Monday, September 15, 2014

SU Video - Star Boxes

Good Morning!  It is Monday and normally that would be a bad thing but the snow is melted and the weather is beautiful!   Unfortunatly our city has a lot of clean up to do from all of the snow last week, so many trees were damaged is just hurts the heart to look at it!   My area was not hit too bad, our trees are small, but some areas are just awful!!


On to brighter news though...  STARS
Stampin' Up put out a video on how to make some super cute Star boxes using the Star Framelits in the Annual Catalogue.   The "Under the Tree" speciality designer series paper is perfect for these little boxes too.   Below the video you can see the ones I made using this tutorial.


I just love these boxes for decorations and with just a couple of minor changes you can turn them into treat boxes too.


Here you can see where I cut a tab down and did not add adhesive so it just tucks in.  You can add a little treat to the box, such as jelly beans and the box is not ruined when opened.  So Fun!

Let me know how your Star Boxes turned out!  


Wednesday, April 23, 2014

Great Gift Idea - Just in time for Mother's Day!

Are you in need of a gift for that Crafty Someone in your lift, or maybe just for yourself!   Stampin' UP now offers Pre-Paid Subscriptions for Paper Pumpkin, Stampin' Up's monthly subscription kit program.


With  Mother's Day just around the corner, it's a great time to take advantage of these prepaid subscriptions that can be bought as gifts. It's the gift that keeps on giving!
ItemPaper Pumpkin Prepaid SubscriptionPrice (Shipping Included)
137858 1 month$24.95
137859 3 months$74.85
137860 6 months$143.70 -- save $1 per month
137861 12 months$275.40 -- save $2 per month

Check out this great offer at www.mypaperpumpkin.com/en-ca/


Sunday, December 22, 2013

It's a Tim Hortons Christmas

Well only 3 more sleeps until Christmas and we are ready!!  Food, presents, baking all done!  Visiting and fun on the agenda for the next 3 days!   I am very excited for Christmas this year, mainly because I got a few things for my Husband that I think he will love and I can not wait to see his reaction!

One of the presents is a gift that keeps on giving!  Tim Horton's Forever!

I bought a gift card and fixed it so it will reload automatically.   He will never run out of his favourite coffee!


 Of course I had to package it just right so I used the "Perfect Blend" set from Stampin' Up and made this adorable gift card holder.

I used Tim Horton's colours, Real Red, Chocolate Chip and Vanilla.  I punched out the Logo from some packaging the Gift Card came in.
Inside I used the word window punch to make a slot for the gift card. I stamped the sentiment with "Yippee Skippee" , "Perfect Blend" and "Fabulous Phrases."


I cannot wait to give this gift!


Just in case I do not get another post out before Christmas, I wish all of my followers a safe, happy, fun-filled and joyous Christmas and Holiday Season.  

Janet Y


Sunday, October 27, 2013

Gorgeous Grunge Gift Card Holder

There are only 1 day left to save 25% off on one of my favourite stamp sets.  I just love Gorgeous Grunge, my girls are getting older now and this set is great for a fun quick gift card or birthday card.

My daughter is turning 9 and her party was today, as a gift in the treat bags we agreed on a Chapters Gift Card.   I was sitting in my craft room last night thinking about a quick way to decorate these gift cards so here we go.
I used bright colours and just went for it.  A couple of quick stamps and I'm done!  The Awesome Thanks comes from "Yippee-Skippee" 


This is just a single sheet of card stock measuring 8 1/4" x 4 1/4" then scored at 2 3/4" , 3 3/4" ,
4 3/4" and 7 1/2".

I then folded it to have an interior pocket (which I created by cutting a slit in the inner flap).   There is a little 1/2 flap on the outside to seal the card shut.  (sorry I forgot to photograph that part).

So easy!!

Below are a couple of pictures of the party.  I lady in my neighbourhood made this amazing cake and below that is my beautiful girl who will be nine on Halloween!!


Don't Forget the Weekly Deals and the 25% off 25 Stamps!!!

Weekly Deals


Let the party begin-We'll bring the gifts! 25% Off 25 Stamp Sets. Hurry-sale ends October 28 - Start saving


Janet Y


Wednesday, August 21, 2013

Splitcoast Stampers Tutorial! - Owl Sucker Holder

Last Halloween I created a cute little broom out of a sucker for my Halloween Club project.  I was really happy with how it turned out but I never thought in my wildest dreams it would be featured on Splitcoast Stampers!   SCS is one of my absolutely favourite web sites for paper crafting.  There are literally thousands of ideas, examples, and tutorials. 

Bette from SCS contacted me and told me she had chosen my little broom to feature as a Tutorial this August and I was honoured.    I set to work on a tutorial and Bette was nice enough to make a video.  So today it went live! 

If you have not been to the Splitcoast Stampers webpage then you should check it out.  The gallery alone is worth the visit.  There is an entire Stampin' Up Gallery that is categorized by stamp set so if you have a set that you want to use you can look it up on this site and get tons of great ideas for it.

Check it out at www.splitcoaststampers.com you will not regret it.

 
Here is the link to the Tutorial on SCS.
 
 
Have a great Day!
 
And don't forget to check out the LNS Treasure Hunt for your chance to win FREE Stampin' Up Products!   Click Here.
 
 
Janet Y


Tuesday, July 2, 2013

Book Lovers Gift Box - Tutorial

A few days ago I posted about some of the gifts I made for my girls teachers.  One in particular got a lot of attention so I thought I would do up a quick tutorial for all of the people who have been asking. 

Here it is, the "Book Lovers Gift Box."  This box holds a gift card perfectly.


Supplies

Designer Series Paper
Card Stock
Chip Board
Strong Adhesive
Sanding Block
Paper Trimmer
Embellishments to Decorate
 
 
Cut your Cardstock down to the following measurements. 
1 piece - 4 x 5 1/4
1 piece - 3 7/8 x 5 1/8
Score both pieces on all sides at 3/4" and cut slits as shown in photo above.

You will also cut a third piece for the spine  4 x 1 1/2  (save for later).

Cut out 2 pieces of Chipboard sized  4 x 2 3/4


 Using sticky strip or strong adhesive create your two halves of the box.  One will be slightly smaller than the other and will fit perfectly inside.  Set aside.


 Now you can cut your DSP sized 4 x 2 3/4.  I cut 4 pieces so I could cover both the inside and outside of the covers.  For my original I actually only used DSP on the outside covers and used the ink on the insides of the covers. 
Using strong adhesive (I used sticky strip and glue) attach the DSP to the Chipboard.  Once they are attached you can use your sanding block to make the edges smooth.
 Now it is time to glue your Cardstock box to your Chipboard Covers. Top picture.

To do this you MUST Put the two side of your Box Together! This is important.


Put the box together using strong adhesive and then, add the front cover on, make sure that the box lines up with the spine side of your book cover.  (Pictured on the Right).  Then add on the back cover and be sure the line up the cover to the same spine side as the front cover. 
Now to add the spine.  Score your card stock piece that is
4 x 1/2 at 1/4" on each of the long sides.

To get that Book Spine Look be sure to add some outward scored lines.  See the spine on the Right, I hope they showed up ok.

Then use sticky strip or some other strong adhesive to glue this to the book covers as shown to the right.


When your book is open it will look like this ...


Now it is time to decorate.  To add a bookmark, just glue some ribbon to the inside of the spine.


A little button, knot or other embellishments add a great little flair and the options for the front are endless.  Stampin' Up has a few new stamp sets and punches that would be great for this project!
 
I just love the This and That DSP for these books.  It is so fun and really versatile.  Another great add-on is the six-sided sampler and punch.
 
Well I hope you find this tutorial helpful and I hope you will comment below and let me know what you think.  If you make some of these I would love to see them.  Email me the link to your blog or a photo of your work.
 
Thanks everyone who had really kind words about my project.
 
Have a great day
 
Janet Y

Saturday, June 29, 2013

School's Out ...

Here in Calgary, Grade School usually ends for the year at the very end of June.  This year the end of June brought devastation to our Province and our City.  Floods closed down most of Calgary, including Downtown and All of the Schools in the city and surrounding areas.  Because of this some kids missed final exams, Grad and their last few days of school.   The School board was kind enough to open up for a half day on Thursday to allow children to say goodbye and collect belongings.

It also gave the kids the opportunity to thank their Teachers for all of the hard work they do all year.  This year I contributed to a gift card for my oldest daughters' teacher but I also made some little gifts for the end of year.

Right: We had a number of Teachers to Thank this year.  Jillian's Grade 3 Teacher as I said got a class gift but we also gave her this "Summer Survival Kit" with a beach towel, magazine and sunscreen.

I created the front of the card on MDS and then printed the top layer on Whisper White Card Stock.  I used my Label Framelits to cut it out and added it to the front of my Mambo/Pacific coloured card.

I got the idea for this from Pinterest.  I love that site.
 Below:  I also had a card for Jillian's Tutor.  She is a wonderful lady who was very helpful to Jillian over the year.   She is also a Steeped Tea representative so I thought this card would make her smile.
There is a removable bookmark on the card which is appropriate since she was helping Jillian with reading!


Above:  A number of years ago I created a gift box and added a spine to it to make it look like a small book!  Using my Simply Scored tool I created score marks in the spine to give it that book look.   I love this idea.  There are so many ways to make this unique and interesting, I mean face it there are thousands of books out there and the colours and styles are endless.

When I first created this I did not have a blog so my Demo (and now Up line) put it on her blog.  I changed things up a bit for this so it is easier to open.  Original post is Here but if you want the directions let me know and I will work on a Tutorial at some point.
 
I really hope Jillian's Piano teacher loves it as much as I do!


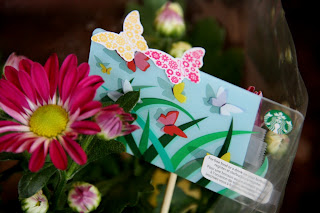
 Above:   These are the gifts for my youngest daughters Pre-school teachers, they are another Pinterest find!   This was a simple and pretty way to say thank you.  Plants and flowers are simple and thoughtful and this time of year we just love to have flowers everywhere.

I used some very old DSP from my stockpile to wrap the flowers. I added some butterflies and ribbon to spruce it up and then put a Starbucks Gift card in there for an extra little treat.
These Starbucks cards were perfect for this! I added some little butterflies for fun!


Well that is my quick post to showcase all of the Teachers gifts we made this year!  Sorry it is so late.  With everything going on in our community I just simply forgot to post it sooner.

To make a donation to Alberta Flood Relief visit www.redcross.ca

Have a wonderful Day!

Janet Y


Tuesday, April 30, 2013

Bloomin' Bouquet Project Kit

Mother's Day. Teacher appreciation. Just because. Say thank you with this no-maintenance bouquet. There's no watering, no weeding-just enjoying. This easy-to-assemble kit comes complete with the petals, stems, and buttons to create the flowers, as well as four different tags to make this the perfect gift for any occasion. All you need is some paper, ribbon or a vase to add the finishing touches to the bouquet.
As if that weren't enough, the kit contains a "baker's dozen"! This means you can create and give (or keep) a dozen flowers, and have a bonus flower left over to pass along to someone new! Give it to someone you wouldn't normally think of: a teller at the bank, a grocery store clerk, or the librarian at your local library. Anyone you encounter on your way that you'd like to give a little "thank you" to-and introduce them to Stampin' Up!

Ordering information:
Item 134542 $15.95
Available starting April 29, while supplies last.
Kit contents:
  • 2 sheets of preprinted and precut flowers on 12" X 12" cardstock; makes 13 flowers using Pool Party, Gumball Green, Calypso Coral, Daffodil Delight, and Rich Razzleberry
  • 13 Vintage Faceted Buttons
  • 13 green floral wire stems
Ideas for this kit ..

  • This kit makes a great gift, both assembled and unassembled. You may want to give it as a fun do-at-home project, or create it yourself to give away.
  • This kit can appeal to both stampers and non-stampers; the ease of assembly means anyone can do it!
  • Great Kit for a Girls Birthday Party Craft or a nice Crafty Ladies night out!
  • Add your own finishing touch to the bouquet: place it in a vase, wrap it up in tissue paper, decorative ribbon, or twine.


  • There is also a Great New Card Kit
     
     
    Introducing Stampin' Ups' next Submit a Project winner—the Dolled-Up Birthday Kit
    created by Chris G. of Ohio!
    Everything you need to create six lovely birthday cards.
     
    Dolled-Up Birthday Kit   133913                               Price $17.95


    REMEMBER - There is only one month left of the current Catalogue so get the Retiring Items while you can!   Also the Spring Mini retires on May 31!


    Also don't forget to look for Treasure Hunt Clues and enter to win the Prize.

    Janet Y


    Related Posts Plugin for WordPress, Blogger...