Pages

Wednesday, October 31, 2012

Happy Halloween Everyone!!

This is a very busy time for me.  My oldest daughters birthday is today and of course it is Halloween and because of this I did not get a project done for today so I am going to show you a project I made a couple of years ago. This is a little hand Sanitizer holder that I got from Erica at Pink Buckaroo Designs. Too cute right?. 


I hope you are enjoying the day and if you are affected by Hurricane Sandy I hope and pray you and yours are all safe and sound.
Thanks for looking!


Janet Y


janetyates@shaw.ca   

Monday, October 29, 2012

ORDER TODAY TO SAVE!!


Stamps
 
 
15% off Sell-a-Stamp Spooktacular
 
Today Only!
 
Contact me by 9pm MT to order!


Sunday, October 28, 2012

Rainbow Cake -- Thank you Pinterest

I think I am in love with Pinterest. I have used so many great ideas from there!  Flavoured water (yum!), Pink Party punch (double yum!!), Card Ideas, Owl and Bird Punch Ideas (see yesterday's post) and I am sure there is more!
 
So when it came time to create a cake for my daughters 8th birthday I went to pinterest for inspiration.  Since her favourite colour is "Rainbow" I thought I would give this great rainbow cake a shot.  I did my research on Pinterest and You Tube and went to find the supplies. 
 
 
Here is how I did it!
 
Two white cake mixes made as per directions,  6 bowls, a 10x14 inch pan, and dye.  The dye most people recommended were the Wilton's Gel Dye.  I used Red Red, Orange, Lemon Yellow, Leaf Green, Royal Blue, and Violet.
 
 
I divided the batter in to the six bowls equally and then added the colours.   Pretty eh?
 
Once all of the batter was ready to go, stir well so all the batter is coloured equally,  I then  poured the batter in as follows.  Purple first spread out evenly over the entire bottom.  I then added the blue, green, yellow, orange and red as shown.
 Do not mix but tap the pan on the counter to even out the batter. I jiggled it a bit too.  Pop in the oven and bake. 
HINT - mine over cooked on the outside before the inside was done so turn the oven down to say 300F or 325F maybe (I cooked mine as per the box at 350F but that was too hot).  I added about 10 minutes on to the time too. 
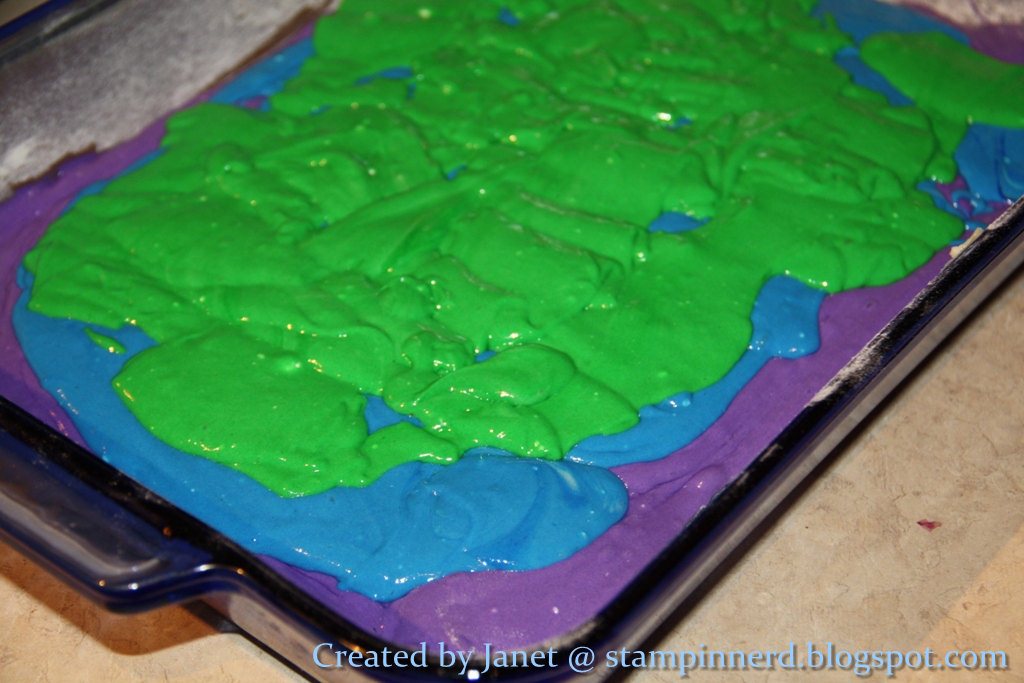
Ok here it is out of the oven.  The bottom was pretty brown from the heat but it still looked awesome when I cut in to it (see below).   Be sure a toothpick inserted to the middle comes out clean. 

 
Here it is decorated!  Two cans of fluffy white icing with a bit of Sky Blue dye and I then used skittles and mini marshmallows to create a rainbow! Fun right!!?  I also used my Stampin' Skills to create fun banner (Pennant Punch and Brights DSP) and pick. 
 
 
Here are the end results!  I love how the colours turned out! It is really bright and fun.  Each piece will be different.  It tastes yummy too!  You know how kids usually eat the icing and leave the cake! This did not happen with this cake. Almost all of the kids ate every bite! 


Cake Supply List and tips ..
 
  • 2 Cake mixes and ingredants as per box. 
  • a 10 x 14 cake pan (greased)
  • Good quality Food Colouring (I used Wiltons Gel Dyes)
    •  Use  Red, Orange, Yellow, Green, Blue, and Purple
  • 6 bowls
Tips...
Turn oven down a least 25 degrees F as to avoid the outside from over cooking.  Use a toothpick to ensure the middle is cooked all the way through.  Freeze the cake before icing it, I wrapped mine in wax paper, glad wrap and tin foil (over kill I know but I found this online and I did not want to risk it).  Buy Regular and Tropical Skittles (there is no blue in the regular pack!). 
 
Ok I think I covered it.  I am so happy with this cake. It is my first attempt at a real cake for my kids. I am a total buy it from the baker Mom but this was pretty easy!
 
Here is my girl blowing out her candle! 
 
Have a great day!  And remember tomorrow is a Special Day at Stampin' Up!  15% off almost all stamp sets!!
 
Thanks for looking!
Janet Y


Saturday, October 27, 2012

Happy BIRDday

My Beautiful, Lovely, Wonderful and Amazing daughter is turning 8 on Wednesday and she LOVES birds. I mean, dreams about, talks about, owns dozens of stuffys, loves birds!   So I try to make a card for her Birthday every year that has a bird on it.  This year I made a bunch of Punch Art Birds, most of which I saw on Pinterest.  I could not pick just one so I put them all on the card.  


Above is the outside of the card.  I was going to add one bird in the little hole but as I said I could not pick just one so I added them all.  I am sure she will be thrilled with them. To the right is the inside of the card.  Above starting at the top going clockwise; Blue Jay, Cockatoo, Robin, and a Cardinal.  Right; Hummingbird, Chickadee, Robin and Red Winged Blackbird. 

The Card is made with Early Espresso Paper and Garden Green Leaves. All of the birds are made with the Bird Builder Punch from Stampin Up, as are the leaves. 
Happy Birthday to My Little Girl.  XOXO
 
Thanks for looking!

Janet Y


Thursday, October 25, 2012

Amazing One Day Sale ... Oct 29

SAVE THE DATE !!!! It's Sell-a-Stamp Spooktaular


One Day Only -- Monday Oct 29th, 2012

Almost EVERY stamp set will be 15% off !!
This 1 day event starts at
12:00am - 11:50 pm ( MT) on Monday Oct 29,2012 

Most Stamp Sets will be 15% off .
which include :

  • Background stamps
  • Personalized Name stamps
  • Cookie press stamps
  • Single Stamps (New Stamps were added today .. click here) .
 
Stamp sets NOT included
  • Hostess only items
  • Bundles
  • Digital Stamp Brush kits
When placing orders online your orders will reflect  the 15% discount on Oct 29, 2012.
Remember this is a 1 day ONLY event .

Here are a few of my favourite sets ...

Up, Up & Away Stamp Set - by Stampin' Up!up, up and away
Lovely As A Tree Stamp Set - by Stampin' Up!  Lovely as a Tree
World Treasures Wood-Mount Stamp Setand, World Treasures.


Thanks for looking and Mark your calendars ..
Oct 29, Pick your stamps and email or call me!


Janet Y

janetyates@shaw.ca    


Wednesday, October 24, 2012

Emboss Resist Christmas

I wanted to get some use out of a great little single stamp in the Annual Catalogue called Star Tree.  It is a la a Carte Stamp.   So I thought I would try my hand at a little Emboss Resist technique.   I stamped the tree in versamark and then put clear embossing powder on it and heat set it.   I then created a reverse mask (basiclly a square cut out of the middle of scrap paper) and sponged my ink in.

 I used Real Red Ink and sponged it in to the middle of my mask (see below)  I then put Dazzling Details around the edge.  When sponging on the ink you will see the Embossed parts "resist" the ink and show up wonderfully.  Hence "Emboss Resist"

 For these two cards I cut out a piece of Card Stock to fit the tree.  I then stamped the tree again in Versamark and used Clear Embossing Powder.  I sponged the entire piece with Real Red (above) and Soft Suede (right).  I backed each piece in glimmer paper, Red and Champagne.


In case you are wondering the Merry Christmas Sentiment  is from Teeny Tiny Wishes.
Here is the top card Under Production!!  I used Sticky Notes on one side to keep the paper in place while I sponged.  I also used a tissue to wipe away extra ink from the embossed section.


Thanks for looking!


Janet Y

janetyates@shaw.ca    

Saturday, October 20, 2012

Challenge -- Freshly Made Sketches # 57

It has been a little while since I did a challenge and I always love the FMS Challenges and I have been wanting to use the Pick Your Poison DSP I got last Halloween.  This was the perfect opportunity!  I love the Pick Your Poison Suite from last year.   It is so creepy yet elegant and you can see the SPOOKY Banner and Halloween houses I made last year using the same products here


I used Cajun Craze for the base and a layer of Basic Black behind the Pick Your Poison DSP.  Black Satin Ribbon to accent along with a Brain in a Jar (how awesome is that little brain!?).
 
 
To see the great entries from Freshly Made Sketches this week Click Here!


I hope you like my little Halloween Card.  Enjoy the rest of your weekend.

Thanks for looking!

Janet Y

janetyates@shaw.ca  

Monday, October 15, 2012

Give Thanks

Thanksgiving was on Oct 8 here in Canada and although I did not celebrate it this year due to an ill child I still took time to be thankful.   I am thankful that I have a wonderful, happy and healthy family (with the exception of an ear infection that weekend of course!) and thankful that I have great friends.  I am also thankful that I get to  be a stay at home Mom and spend lots of time with my kids while they are young.   Of course I am thankful to be a Stampin UP Demo too,  I get to turn what I love into my job and share it with so many wonderful people, and although Thanksgiving is over I still love the season and because I do I made the card below this past week.


The Neutrals are quickly becoming my favourite colour family.  Here I used Crumb Cake, Very Vanilla and Early Espresso.

I also used one of my favourite Stamp Sets, Lovely as a Tree.  I added a little sparkle to the trees using my glue pen and some Dazzling Diamonds.  The Ribbon is Seam Binding in Crumb Cake and the Sentiment is from the Stamp Set Hand-Penned Holidays.


Thanks for looking!


Janet Y

janetyates@shaw.ca  

Friday, October 12, 2012

Halloween Treat Boxes

Halloween is just around the corner and I have been working on ideas for a quick little treat box for my daughters pre-school class.  I wanted something that would be really simple to make and that would help me use up some of my old Halloween DSP!  I have a lot of retired DSP and I am always looking for ways to use it up so I have a reason to get more.  Using the Petite Pocket Die and the Matchbox Die (retired) I created these little boxes.


 I used some Creepy Crawly DSP as well as Pumpkin Pie, Basic Black, More Mustard, and Whisper White Card Stock.   I also used the retired stamp set Booglie Eyes and the current sets  Teeny, Tiny Wishes and Mixed Medley.  
 If you want to check out some of my other Halloween creations Click Here! 

Have a great weekend everyone.


Thanks for looking!

Janet Y

janetyates@shaw.ca 

Friday, October 5, 2012

Happy Thanksgiving

If you live in Canada then you know that this is a long weekend!  Thanksgiving long weekend!  A wonderful Fall tradition of Turkey, Pumpkin Pie and Family.  Autumn is one of my favourite times of year.  The colours are amazing and it makes for really great crafting.  Weather you are making cards or a scrapbook page, leaves are a great embellishment!   I made a card back in August using the baby wipe technique on the leaves.  Well I loved those leaves so much I had to do it again! 

I also love the new "Core'dinations Card Stock"  here you will see the Early Espresso. This card stock has a monochroamatic core that when cut, ripped or sanded you will see and makes a wonderful effect!

In this card I have used the Woodgrain Embossing folder with the Card Stock and then sanded it down to really bring out the Woodgrain look. 


The base is Crumb Cake as is the label.  I used Hemp twine (unfortunately it is retired) and the naturals Buttons from the current catalogue.  The leaves are from the Gently Falling Stamp Set.  The Sentiment is from the Thankful For.. stamp set that is now retired.

To create the leaves I folded a wet baby wipe into a square and dropped ink into it. I used Pumpkin Pie, Real Red, Old Olive and Daffodil Delight re-inkers.  I also added the crystal effects but I am not sure they show up in the photos.
 
Anyway,  Happy Thanksgiving to all my Canadian followers!  Hope you have a great, fun filled, food filled and family filled long weekend!
 
Take care and Thanks for looking!


Janet Y

janetyates@shaw.ca

Thursday, October 4, 2012

Happy Birthday Silhouette Style

My good friend Melanie is celebrating her birthday today and I wanted to make a beautiful card for her!   I have had the set Serene Silhouettes sitting around for some time and I really love it.  Today I went to work creating a lovely silhouette scene. 


I used Sponges for the sunrise in the colours of Daffodil Delight, Pumpkin Pie, Tangerine Tango and Real Red.   I used Basic Black for the image and my brayer for the hill!   The Paper is in the same colours of Tangerine, Daffodil and Black. 


Happy Birthday Melanie ... I will have your card to you Saturday ;)

Take care and Thanks for looking!


Janet Y

janetyates@shaw.ca

Monday, October 1, 2012

Another Great Offer from Stampin' UP!

Have you ever looked at a stamp set and thought "I would love that one stamp but I don't love them all!"  Well Stampin' Up is trying something new!  Starting Oct 1 until Jan. 2 2013 Stampin Up will be selling select phrase sets individually!!  


Things to Note ..

  • These won't be sent to you in our typical cases or packaging; they'll be packaged in cello bags. If you'd like a case for your stamp, you can buy our Clear-Mount Stamp Cases that come in packs of four (item 119105).
  • This offer is available for clear-mount stamps only.
  • The stamps won't come with a Clear-Mount Block, and you'll need to buy a block separately if you don't already have one. The recommended block sizes can be found on the webpage.
  • There's no limit on how many pieces you can buy.
  • This offer is not available in Quebec.
  • Remember that this is a pilot program, so take advantage of it while you can!


  •  
     
    There are some great stamps to be had!  I think I may have to buy this one...
     
    Seasonal Sayings: Christmas Clear-Mount Stamp
     
    To place an order check out my SU Website or email me at janetyates@shaw.ca.
     
     
    Take care and Thanks for looking!
    Janet Y


    Merry Christmas Gift from Stampin' Up!


    October 1 - 31, 2012
    Jump for joy! Get a FREE Festive Paper-Piercing Pack when you purchase the Stampin' Up! Ornament Keepsakes Set and Candlelight Christmas Specialty Designer Series Paper. Click brochure below to see products.


    Item
    Description
    Retail Value
    Special Price
    132260
    Christmas Gift Pack (wood-mount)
    Includes Ornament Keepsakes Set (wood-mount), Candlelight Christmas Specialty Designer Series Paper, Festive Paper-Piercing Pack
    $69.85
    $58.90
    132261Christmas Gift Pack (clear-mount)
    Includes Ornament Keepsakes Set (clear-mount), Candlelight Christmas Specialty Designer Series Paper, Festive Paper-Piercing Pack
    $58.85
    $47.90
    132262Christmas Gift Pack (wood-mount bundle)
    Includes Ornament Keepsakes Bundle (wood-mount), Candlelight Christmas Specialty Designer Series Paper, and Festive Paper-Piercing Pack
    $88.85
    $77.90
    132263Christmas Gift Pack (clear-mount bundle)
    Includes Ornament Keepsakes Bundle (clear-mount), Candlelight Christmas Specialty Designer Series Paper, and Festive Paper-Piercing Pack
    $79.85
    $68.90

    The Fine Print
    • See those special item numbers above? You've got to use those in order to get your FREE Festive Paper-Piercing Pack.
    • You and your customers can get your FREE paper-piercing pack by purchasing the Ornament Keepsakes Set and Candlelight Christmas Specialty Designer Series Paper or the Ornament Keepsakes Bundle and Candlelight Christmas Specialty Designer Series Paper. Remember: the bundle gets you an additional 15 percent off the set and the Holiday Ornaments Framelits Dies. So many options!
    • Any order type qualifies for this promotion-customer, demonstrator, workshop, or online.
    • This promotion has no limits-for every bundle you buy, you'll get a free Festive Paper-Piercing Pack. They make great Christmas gifts!
    • Sorry-hostess dollars don't count toward this promotion.
    • If you want your free gift, you need to make sure you place your order before the following deadlines:
      • Phone: Wednesday, October 31, 2012; 6:50 PM (MT)
      • OEX or Online: Wednesday, October 31, 2012; 11:50 PM (MT)

    Take care and Thanks for looking!


    Janet Y

    janetyates@shaw.ca

    Related Posts Plugin for WordPress, Blogger...